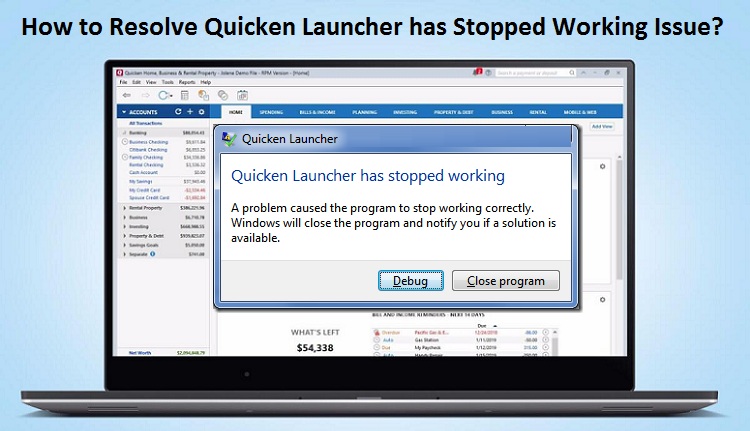
Quicken is a financial popular program widely used for managing the accounts. Being a very much useful and hands-free application, bugs and errors can also interrupt because of some mistakes and that will be affected your work. Sometimes, you may encounter an error “Quicken Launcher Has Stopped Working” which makes too much annoy as it disrupts your work badly. Such a problematic hurdle generally been arisen when your Quicken can’t identify the path of essential files. For getting the issue resolved within a couple of seconds, you need to avail Quicken Customer Service as it is the top-notch and trustworthy. The talented team is working day to night to deliver fruitful solution in a handy way.

Reasons for Quicken Launcher has Stopped Working Issue
Before dealing with any issue, you should first need to identify its causes, means what are the reasons due to which you come across such a problematic situation. Once you detect the main reason behind it, you can easily eradicate the error from the root. Hence, let’s have a glimpse on the noted points to come to know about the reasons:
- Your Quicken Launcher won’t work if your .NET Framework is damaged or missing
- If there is a compatibility issues with your Windows and Quicken application
- Windows don’t have sufficient permissions for accessing Quicken
- Compatibility issues with old Quicken icon
- Quicken is not properly installed
These are the various reasons due to which you can come across with such problem. So, make sure all these are functioning well. Still, reading this blog to get the effective solution of this problem.
Solutions to Resolve Quicken Launcher has Stopped Working Issue
Go through the below-noted steps one-by-one appropriately to get the issue resolved in a pinch:
Step 1: Missing .NET Framework
- When you open Quicken, you may get an error message for installation .NET Framework
- You are required to download .NET Framework
- Make sure that you are installing the correct version of .NET Framework according to your operating system. Suppose, if you have a 32-bit operating, then you must install the 32-bit .NET Framework
- Now, run the .exe file to install Quicken
- Though, you can also update the Quicken to the latest version that will install .NET Framework automatically
Step 2: Compatibility Issues
If there is a compatibility issue between your Windows and Quicken then go through the below steps:
- Right-click on “Quicken” icon and choose “Properties” option from the given-list
- Now, go to “Compatibility” section and mark a check onto the ‘Run this program in compatibility mode’
- Next, choose Windows Vista from the list
- Uncheck ‘Run this program in compatibility mode’
- Click “Apply” and “OK” to save the changes
- And then try to open Quicken and see if an error message “Quicken launcher has stopped working” still appearing or not
Step 3: Compatibility Issue Association with Old Quicken Icon
For Windows 8/8.1/10
- First, go to “File Explorer” and then click on “This PC”
- Next, tap on “Local Disc (C :)”
- Go to Program Files and look for Quicken folder
- Click on Quicken folder
- Double click on QW.exe from the list
For Windows 7/Vista
- Click on “Start” button and choose “My Computer” option and hit on it
- Now, click on “Local Disc (C :)”
- Go to “Program Files” and look for “Quicken” folder
- Once you find it, click on it and then give a double click on QW.exe
Step 4: Enable Sufficient Permissions to use Quicken
Before going its further step, you should assure that you are logged in as an Administrator.
For Windows 8/10
- First go to “File Explorer” and then click on “This PC”
- Now, click on “Local Disc C:” >> Program Files
- Search for Quicken Folder and place a right click on it
- Go to Properties > Security > Advanced > Change Permissions
- Change it to Full Control
For Windows 7
- First go to “File Explorer” and then click on “This PC”
- Now, click on “Local Disc C:” >> Program Files
- Search for Quicken Folder and place a right click on it
- Go to Properties > Security> Advanced > Administrator > Edit
- Now, choose “Continue” button and click on “Administrator”
- After that, tap on Edit > Continue > Full Control
- And at the end, click “OK” to save the changes
Step 5: Uninstall/Reinstall Quicken
If none of the steps work to terminate Quicken Launcher unable to work issue, then the best solution is to first uninstall Quicken and then reinstall it for better assessment.
Dial Quicken Support Phone Number for One-Stop Remedy
If you are not enough skilled or don’t have technical knowledge to exterminate Quicken Launcher Has Stopped Working issue on your own, then give an instant call at Quicken Support Phone Number. One of our highly expert technicians will contact you and provide you effectual solution within a short span of time.
Frequently Asked Questions (FAQs)
What Is Quicken Launcher?
Do you want to know about the Quicken Launcher? It is a kind of an executable file which helps in giving a quick start to the Quicken Software. Qw.exe is another name of the executable file of your Quicken launcher.With the aid of Quicken Launcher, you will be able to run the Quicken application in a trouble free manner. However, if you are running into any kind of problems with your Quicken launcher, you should take help from experts. Here, they will suggest you the right way to resolve any problems with the Quicken Launcher.
How To Check System Type?
Are you one of those who are looking to check the System type of your computer or laptop? Don’t you know how to do so? For that, you have to go to start button and then right-click on it to opt for the System option. Here, you need to reach out to the Device specifications where you will see an about section of your system. In the next step, you will find the system type: 32-bit or 64-bit operating system. Also, you will get to know whether your system has x64-based processor or x86-based processor.
How And Where To Download .Net Framework?
To contact Quicken by Phone is an effortless manner as you are not required to visit any place. Just simply by sitting at your home can dial +1-650-250-1900 helpline provided number and stay tuned with the extra-talented techies hassle-freely. They have proficiency to deal with your Quicken related problems within a pinchTo download .Net Framework, you should first navigate to .NET installer executable file, and then run it. For that, you have to right-click on the executable file and then opt for the option says ‘Run as administrator’. Here, you will come across the license terms which you need to read carefully. Once done, you should accept the license terms. In the next step, you should select the checkbox and then click on the ‘Install’ option. Apart from that, you can also get more information about the same by just approaching the experts at anytime.
Why Is Quicken Not Responding?
Sometimes while working on Quicken, most of the users might come across several sorts of problems. Quicken not responding is one of the most common that users encounter due to sudden program update. However, you face the same problems when any new application installed in your system doesn’t allow your Quicken to work. To get rid of such kind of problems, you have to restart your Quicken. On the other hand, you should also need to update your Quicken programs if available. Moreover, you can also take help directly from the Quicken experts and get the feasible assistance at anytime.