How to Convert Quicken Windows to Mac? | Quick Steps
Converting Quicken Windows to Mac doesn’t sound too complicated as both have been developed by a common tech giant, Intuit Inc. However, the users still have to be quite particular while choosing the right steps to convert Quicken Windows to Mac. The users can convert accounts, transactions, reports, and many such things from Quicken Windows to Mac.
If you are using Quicken version 2018 or later (in Windows), you don’t have to buy Quicken for Mac to convert the Quicken files from Windows OS to Macintosh. While for the Quicken version before 2018, there is a need to buy Quicken for Mac separately. It all happens because the Quicken released after 2018 is available for both Windows and Mac operating systems. This article is prepared to eliminate the confusion about transferring Quicken from Windows to Mac and provide you a DIY guide online or manual methods.
Verify These Things Before Converting Quicken Windows to Mac
You don’t want to wait, but you must verify some essential things before heading over to convert Quicken Windows to Mac. These are as important as transferring Quicken Windows to Mac.
- Validate & repair your Quicken in Windows file
- Launch Quicken on your computer.
- Go to the File
- Click file operations and then choose Validate and repair.
- Checkmark in front of the Validate file.
- Click ok to save the settings.
- This process might take some time to complete, and once it’s successful, you will see the Data_Log file without any errors.
Verify that Your Quicken is Updated to the Latest Version
- You can check for the latest version in the Quicken application and for that launch Quicken.
- Go to the help tab.
- Click check for updates.
- Now keep following on-screen instructions to update your Quicken.
Make sure to create a backup of your File to avoid losing your financial data
- Open Quicken.
- Click the file tab in the top menu bar.
- Go to backup and restore and click backup Quicken file.
- Keep following the on-screen instructions to end the backup process.
Check your account balance before and after the conversion
- Please take a note of the account balances before converting Quicken Windows to Mac.
- In case the data doesn’t match after converting the files, then you will need to add them manually.
- Additionally, edit any Quicken categories, go to tools, click category list, and alter the required categories.
- Similarly, edit any Quicken payees, go to tools, click memorized payee list and alter the payees you want.
Now here is how to convert Quicken Windows to Mac (Manually or Online)
Method 1. Manually converting Quicken Windows to Mac using a USB stick
Connect USB stick to Windows > Backup Quicken file > Save in USB drive > Eject USB drive > Restore backup in Mac
Also Read: How to fix Quicken Cloud Sync Error with simple steps
Here are the detailed steps to manually create a backup for Quicken in Windows
- Connect the USB drive to your Windows PC. Ensure it has enough space to store the Quicken.
- Launch Quicken on your Windows computer.
- Now go to the Files menu.
- Click the option backup and restore.
- Choose the option backup Quicken file.
- Next, you will need to checkmark in front of Add date to the backup file name and click change.
- You will be prompted to select the location to save the File, choose the USB drive, and click save.
- Finally, click backup now.
- Now eject the USB drive, and Quicken is ready to be converted from Windows to Mac.
Steps to manually restore Quicken backup in Mac
- Ensure your Mac is installed with the latest Quicken version; if it doesn’t, then navigate to the Intuit website and install it on your Mac.
- Connect the USB drive (loaded with Quicken backup) to your Mac.
- Now open Quicken on your Mac.
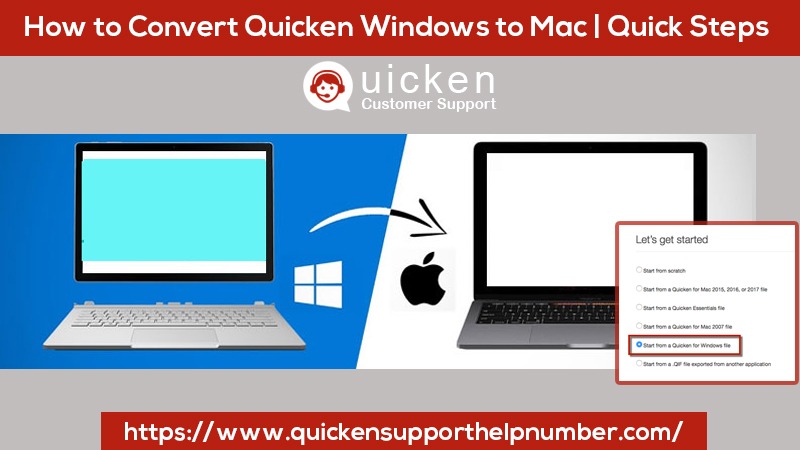
- You will be prompted to sign in to your account. Enter your Quicken ID & password and click the sign-in option.
- Now you will see let’s get started screen, here click start from a Quicken for Windows file and click next.
- After that, you will need to choose the File that you want to convert from a USB or flash drive location.
- Click on the data file and click open.
- Further, Quicken will start converting your data from Windows to Mac.
- You might have to wait for a few minutes as this could be a time-consuming process.
- Great! You have just converted Quicken Windows to Mac.
Method 2. Convert Quicken Windows to Mac using DropBox or Google Drive
Install DropBox or Google Drive in Windows > Backup Quicken file > Save in DropBox or Google Drive > Restore backup in Mac
Let’s discuss the detailed steps to create a backup for Quicken in Windows (online)
- Firstly, ensure you have DropBox or Google Drive installed in your Windows.
- Now open Quicken on your Windows computer.
- Go to the File tab and click backup & restore.
- Click backup Quicken file.
- Click the option “Add date to the backup file name so that it should appear different” and click change.
- When the system prompts you to select the location to save the File, choose DropBox or Google Drive, and click save.
- In the end, click backup now.
- Now you can close Dropbox or Google Drive you are all set to restore Quicken in Mac.
Here is how you can restore the Quicken backup in Mac (online)
- Make sure to install an online medium in which you have created the Quicken file backup in Windows.
- Now open Quicken on your Mac.
- Enter your Quicken ID and password and click sign.
- Choose the options to start from a Quicken for Windows file and click next.
- After that, you will need to click on the Select File to convert and choose either DropBox or Google Drive location to save the data.
- Click next and Quicken files will start to convert from Windows to Mac.
- You might have to wait for some time as this could be a time-consuming process.
- Congratulations! You have successfully transferred Quicken Windows to Mac using an online medium.
Have you converted Quicken Windows to Mac? Now here is what you need to do
It doesn’t stop here. Once you converted the Quicken Windows to Mac, you will need to check and verify a few things. The instructions are given below.
- Firstly, you need to check the categories and ensure that they are the same as in Windows.
- Open Quicken on Mac, go to categories, and click on the pencil icon to edit the categories.
- Similarly, you will need to check the payee’s list.
- In Quicken, go to payees, select your payee and then click on edit to make the changes you want.
- Also, check the accounts list and ensure that all the financial information is the same as in Windows.
Need help to convert Quicken from Windows to Mac or vice-versa? Call us now
Hopefully, you enjoyed the overall process of converting the Quicken Windows to Mac (manually or online). You will need a flash drive or USB stick for the manual method while using an online medium will require you to use DropBox or Google Drive. If you are still confused about how to convert Quicken Windows to Mac, then you can straightaway drop us a call on the Quicken support number, and our Quicken expert will get in touch with you soon. We are available 24/7 for your assistance.


50 Comments
Online medicatie kopen zonder recept bij het beste Benu apotheek alternatief in Amsterdam Rotterdam Utrecht Den Haag Eindhoven Groningen Tilburg Almere Breda Nijmegen Noord-Holland Zuid-Holland Noord-Brabant Limburg Zeeland Online medicatie kopen zonder r · October 8, 2023 at 7:34 pm
… [Trackback]
[…] There you can find 31471 more Info on that Topic: quickensupporthelpnumber.com/blog/convert-quicken-windows-to-mac/ […]
โรงแรมสุนัขเข้าได้ · October 11, 2023 at 1:13 am
… [Trackback]
[…] Read More on that Topic: quickensupporthelpnumber.com/blog/convert-quicken-windows-to-mac/ […]
click here · October 23, 2023 at 5:48 am
… [Trackback]
[…] Find More Information here on that Topic: quickensupporthelpnumber.com/blog/convert-quicken-windows-to-mac/ […]
super kaya 88 slot · October 24, 2023 at 3:37 am
… [Trackback]
[…] Read More Information here to that Topic: quickensupporthelpnumber.com/blog/convert-quicken-windows-to-mac/ […]
เว็บดูบอล · November 2, 2023 at 7:53 pm
… [Trackback]
[…] Info on that Topic: quickensupporthelpnumber.com/blog/convert-quicken-windows-to-mac/ […]
웹툰 사이트 · November 22, 2023 at 8:18 pm
… [Trackback]
[…] Read More Information here to that Topic: quickensupporthelpnumber.com/blog/convert-quicken-windows-to-mac/ […]
Bangla Boxing Stadium · November 23, 2023 at 5:41 pm
… [Trackback]
[…] There you can find 91854 more Info on that Topic: quickensupporthelpnumber.com/blog/convert-quicken-windows-to-mac/ […]
วิเคราะห์บอลวันนี้ · December 19, 2023 at 6:25 pm
… [Trackback]
[…] Find More Info here on that Topic: quickensupporthelpnumber.com/blog/convert-quicken-windows-to-mac/ […]
COUNTERFEIT MONEY FOR SALE · February 8, 2024 at 2:29 am
… [Trackback]
[…] Information to that Topic: quickensupporthelpnumber.com/blog/convert-quicken-windows-to-mac/ […]
หวยออนไลน์ LSM99 · March 3, 2024 at 6:58 pm
… [Trackback]
[…] Here you can find 97700 additional Info on that Topic: quickensupporthelpnumber.com/blog/convert-quicken-windows-to-mac/ […]
naza24 · March 3, 2024 at 11:29 pm
… [Trackback]
[…] Find More on on that Topic: quickensupporthelpnumber.com/blog/convert-quicken-windows-to-mac/ […]
side effects of ozempic · March 22, 2024 at 10:41 am
… [Trackback]
[…] Find More on to that Topic: quickensupporthelpnumber.com/blog/convert-quicken-windows-to-mac/ […]
พอตไฟฟ้า · April 19, 2024 at 5:31 pm
… [Trackback]
[…] Find More Info here to that Topic: quickensupporthelpnumber.com/blog/convert-quicken-windows-to-mac/ […]
micro dose chocolate · May 1, 2024 at 3:40 pm
… [Trackback]
[…] Find More on on that Topic: quickensupporthelpnumber.com/blog/convert-quicken-windows-to-mac/ […]
สล็อตค่ายใหญ่ · May 5, 2024 at 6:36 pm
… [Trackback]
[…] Read More on that Topic: quickensupporthelpnumber.com/blog/convert-quicken-windows-to-mac/ […]
นายหน้างานตกแต่งภายใน ให้ค่าคอมมิชชั่นสูง · May 16, 2024 at 10:11 pm
… [Trackback]
[…] Information on that Topic: quickensupporthelpnumber.com/blog/convert-quicken-windows-to-mac/ […]
Liquid LSD smooth transaction · June 11, 2024 at 11:34 am
… [Trackback]
[…] Information on that Topic: quickensupporthelpnumber.com/blog/convert-quicken-windows-to-mac/ […]
คอริ่ง · June 15, 2024 at 6:08 pm
… [Trackback]
[…] Here you will find 227 additional Info to that Topic: quickensupporthelpnumber.com/blog/convert-quicken-windows-to-mac/ […]
buy valganciclovir · July 11, 2024 at 12:21 pm
… [Trackback]
[…] Info to that Topic: quickensupporthelpnumber.com/blog/convert-quicken-windows-to-mac/ […]
חברות אחסון אתרים מומלצות · July 20, 2024 at 6:32 pm
… [Trackback]
[…] Read More on on that Topic: quickensupporthelpnumber.com/blog/convert-quicken-windows-to-mac/ […]
sell nuclear weapons · July 24, 2024 at 1:50 am
… [Trackback]
[…] There you will find 51856 more Information on that Topic: quickensupporthelpnumber.com/blog/convert-quicken-windows-to-mac/ […]
หวยลาว ผลหวยลาว แทงง่าย จ่ายไม่อั้น บาทละ 1,000 · August 29, 2024 at 4:33 pm
… [Trackback]
[…] Find More on that Topic: quickensupporthelpnumber.com/blog/convert-quicken-windows-to-mac/ […]
บริษัทรับทำเว็บไซต์ · September 5, 2024 at 8:50 pm
… [Trackback]
[…] Information on that Topic: quickensupporthelpnumber.com/blog/convert-quicken-windows-to-mac/ […]
luggage storage bangkok · September 11, 2024 at 8:57 pm
… [Trackback]
[…] Find More on that Topic: quickensupporthelpnumber.com/blog/convert-quicken-windows-to-mac/ […]
Morpheus8 · September 16, 2024 at 11:50 pm
… [Trackback]
[…] There you will find 19794 more Information on that Topic: quickensupporthelpnumber.com/blog/convert-quicken-windows-to-mac/ […]
บ้านพักพูลวิลล่า หัวหิน · September 22, 2024 at 8:25 am
… [Trackback]
[…] Here you will find 44343 additional Info to that Topic: quickensupporthelpnumber.com/blog/convert-quicken-windows-to-mac/ […]
dultogel promo · September 22, 2024 at 4:47 pm
… [Trackback]
[…] Read More here to that Topic: quickensupporthelpnumber.com/blog/convert-quicken-windows-to-mac/ […]
go88 · October 12, 2024 at 5:35 am
… [Trackback]
[…] Find More to that Topic: quickensupporthelpnumber.com/blog/convert-quicken-windows-to-mac/ […]
marbo 9000 · October 15, 2024 at 3:51 am
… [Trackback]
[…] Info to that Topic: quickensupporthelpnumber.com/blog/convert-quicken-windows-to-mac/ […]
ร้านเค้กวันเกิดใกล้ฉัน · October 22, 2024 at 10:58 pm
… [Trackback]
[…] Information on that Topic: quickensupporthelpnumber.com/blog/convert-quicken-windows-to-mac/ […]
rose sour plum mint · October 23, 2024 at 9:01 pm
… [Trackback]
[…] Find More to that Topic: quickensupporthelpnumber.com/blog/convert-quicken-windows-to-mac/ […]
bk88 · November 1, 2024 at 5:39 pm
… [Trackback]
[…] Find More on that Topic: quickensupporthelpnumber.com/blog/convert-quicken-windows-to-mac/ […]
รับจัดงานอีเว้นท์ · November 16, 2024 at 12:26 am
… [Trackback]
[…] Read More Info here to that Topic: quickensupporthelpnumber.com/blog/convert-quicken-windows-to-mac/ […]
PGSLOT โบนัสแตกง่าย ไม่มีโกง · November 18, 2024 at 12:07 am
… [Trackback]
[…] Info on that Topic: quickensupporthelpnumber.com/blog/convert-quicken-windows-to-mac/ […]
Jaxx Liberty · November 18, 2024 at 8:20 am
… [Trackback]
[…] Info to that Topic: quickensupporthelpnumber.com/blog/convert-quicken-windows-to-mac/ […]
ทางเข้าpg · November 19, 2024 at 5:07 am
… [Trackback]
[…] Find More here to that Topic: quickensupporthelpnumber.com/blog/convert-quicken-windows-to-mac/ […]
rca77 · November 22, 2024 at 5:28 am
… [Trackback]
[…] There you can find 21183 additional Info to that Topic: quickensupporthelpnumber.com/blog/convert-quicken-windows-to-mac/ […]
slot99 · November 24, 2024 at 8:36 pm
… [Trackback]
[…] Find More here to that Topic: quickensupporthelpnumber.com/blog/convert-quicken-windows-to-mac/ […]
Onion Server · November 28, 2024 at 1:36 am
… [Trackback]
[…] Read More to that Topic: quickensupporthelpnumber.com/blog/convert-quicken-windows-to-mac/ […]
ทัวร์เวียดนาม · December 8, 2024 at 6:56 pm
… [Trackback]
[…] Read More Info here on that Topic: quickensupporthelpnumber.com/blog/convert-quicken-windows-to-mac/ […]
Download Full Albums · December 12, 2024 at 7:37 am
… [Trackback]
[…] Info to that Topic: quickensupporthelpnumber.com/blog/convert-quicken-windows-to-mac/ […]
เครื่องซีลสูญญากาศ · December 19, 2024 at 5:24 am
… [Trackback]
[…] There you can find 11227 additional Information to that Topic: quickensupporthelpnumber.com/blog/convert-quicken-windows-to-mac/ […]
upx1688 · January 4, 2025 at 12:03 am
… [Trackback]
[…] Here you can find 18948 more Info on that Topic: quickensupporthelpnumber.com/blog/convert-quicken-windows-to-mac/ […]
ufa168 · January 5, 2025 at 3:51 am
… [Trackback]
[…] Here you can find 67310 more Information on that Topic: quickensupporthelpnumber.com/blog/convert-quicken-windows-to-mac/ […]
ออกแบบเสื้อยืด · January 7, 2025 at 11:15 pm
… [Trackback]
[…] Read More here on that Topic: quickensupporthelpnumber.com/blog/convert-quicken-windows-to-mac/ […]
lazywin888 · January 25, 2025 at 2:17 pm
… [Trackback]
[…] Here you can find 73343 more Info to that Topic: quickensupporthelpnumber.com/blog/convert-quicken-windows-to-mac/ […]
site · February 4, 2025 at 3:49 pm
… [Trackback]
[…] Information on that Topic: quickensupporthelpnumber.com/blog/convert-quicken-windows-to-mac/ […]
my profile · February 18, 2025 at 12:43 am
… [Trackback]
[…] Find More to that Topic: quickensupporthelpnumber.com/blog/convert-quicken-windows-to-mac/ […]
Learn more · February 21, 2025 at 12:15 am
… [Trackback]
[…] Read More on to that Topic: quickensupporthelpnumber.com/blog/convert-quicken-windows-to-mac/ […]
n-ethylpentedrone kopen | buy 2mmc | 6 apb pellets | buy 5-mapb | deschloroketamine | 4-mpd (4-methylpentedrone) | 6 apb powder | 2-mmc pellets, 5-mapb | 2-mmc crystalline powder | 4bmc poeder | acheter 3-me-pcp | buy cathinonen | buy 6 apb powder |NEP N- · February 28, 2025 at 11:04 am
… [Trackback]
[…] Info to that Topic: quickensupporthelpnumber.com/blog/convert-quicken-windows-to-mac/ […]
Comments are closed.